By Mario Pisa
In this post, we will review the basic tools that every quant developer should have in their toolbox. To do so, we will create a small project to modify a free software library and publish our changes.
This article covers:
- Why developing your own trading machine is a good idea!
- Code editors
- Command line terminals
- Development environments
- Software changes and version control
- Data repositories
- IDEs (Integrated Development Environment)
- Machines in the cloud
- Development libraries
Why building your own trading machine is a good idea!
There are many tools that make the quant programmer’s life easier when interacting with the machine. Choosing the right tools is often a matter of personal taste, so each programmer has their own preferences.
However, regardless of the software application that we use, we must think about the toolbox that will facilitate the task of developing algorithms and applications, since it is not so important the specific application that we use, but the functionality it offers.
The operating system (Windows/Mac/Linux) is indifferent to deploying a professional development system. Although there are countless paid tools, here we will focus on free software tools available to all operating systems or particular mention will be made when it is the case.
The development tools mentioned here are common to all programming languages. Nevertheless, I would like to mention that some languages have very specific IDEs which are probably the most convenient.
In any case, here we will take Python as an example language, but insist that the ideas we elaborate are valid for any programming language.
Finally, this is not an installation or instruction manual for any of the tools mentioned here, so the interested reader is advised to visit the pages of the applications that are of interest.
Code editors
A code editor is nothing more than a simple text editor. For this purpose, we could use the Notepad of Windows, the TextEdit of Mac or the Vi of Linux. However, these are quite limited in functionality because they lack programming aids. Programming aids make us really productive when we work.
A good code editor must allow the integration of small programming tools, interpreters and compilers that help us with the task of programming a machine.
Emacs code editor
Emacs is the editor par excellence. It is an application with 35 years of history behind it, coming from the Unix/Linux world and available for Windows and Mac in its most modern versions.
It is undoubtedly the most flexible to work with any programming language but in exchange for a certain complexity in handling. Although the latest versions have available a GUI, the real power of the editor is obtained from the command line of Emacs itself.
Atom code editor
Another great text editor that offers enormous versatility for any programming language is Atom. It is multiplatform (Windows/Mac/Linux) and allows us to integrate many tools that will facilitate the task of programming. Atom has thousands of additional packages to turn it into a complete IDE completely customized for our purposes.
Since we are going to use Python as a programming language here, the first thing we must do is install some of the various packages available to enhance our development experience with Python within Atom.
For example, the packages hydrogen, python-ide and python-tools will allow us to run python code in Atom and will offer us help to autocomplete the code, function definitions and so on.
Atom has many other packages that will help us for example, write code according to the WBS style guide, refactor the code, generate test code, etc.
As I said in the introduction, the choice of a code editor and/or an IDE is a matter of personal taste, so any other editor that makes you feel comfortable and has help and programming is perfectly valid.
Command line terminals
“In the beginning… was the command line” is the title of Neal Stephenson’s book that brilliantly narrates the evolution of machine interfaces with humans. A book worth reading to understand how the human-machine relationship has evolved.
There is no doubt that the current operating systems with their GUI have notably improved the interaction we have with machines. We just have to think about how it would be to implement a simple mean-crossover algorithm in punch cards or develop it in assembler (ASM) to feel lucky.
From operating the machine with a mouse to the devices for operating the machine with the mind are laudable interfaces but limited to the unique functionality that the developer has implemented.
To extract the full capability of a machine through its operating system we need a command line terminal. A terminal, also called a console or shell, opens the doors to the machine’s plumbing and allows us to interact through commands.
Command line terminals for Linux
For Linux, it is the classic interface, although the most downloaded distributions are those that are Windows-like such as Ubuntu. There are “pure” distributions that are simple terminals like the Slackware distribution. If you are using the GUI, you can open the Term application or press Alt+Ctrl+F1.
For Mac, there is the Terminal application and the commands are the same as in Linux since Mac is built on the AT&T Unix.
For Windows, we can open the application MS-DOS cmd.exe although it is quite limited in terms of the set of commands we can launch. To upgrade our command line in Windows, we need to install the Powershell which expands the command catalogue and you can also get a Linux shell in Windows or simply install Cygwin for users of older versions of Windows.
When we have ease handling the command line we can find ourselves with multiple open terminals and the tedious change of window or application, to facilitate the work with multiple terminals and configure each of them with its own profile, we can use the iTerm for Mac or the ConEmu for Windows.
These applications do not replace the terminal, simply allow us to manage multiple windows within the application itself and manage profiles in each window.
Learning to handle the command line well is not an easy task, but it requires nothing more than patience, perseverance and a good manual always at hand.
Finally indicate that Atom allows us to integrate a terminal within the editor itself so we avoid having to be changing windows to launch commands and we can run scripts within Atom, you can try the terminal-tab package although there are others with different purposes.
Development environments
When we work on several projects, it is convenient to isolate the versions of the libraries we are using, among other things, so that changes in one project do not negatively affect another project.
If a project needs Python 3.5 with Pandas 0.21 and another project needs Python 3.7 and Pandas 1.0.2 it is mandatory to use a development environment manager.
In other words, a development environment manager covers the need to use different versions of the interpreter or compiler of the programming language that we are using and the additional libraries that the project needs.
By isolating a development environment we avoid the tragedies that occur when installing a new version of a library so that the rest of the projects stop working.
These managers can be found for most programming languages. Some of the better-known ones are ruby version manager rvm, RSwitch for the R kernel and renv for the R packages.
To work with different versions of Python and different versions of libraries we will use Conda. Conda is the development environment manager available with Anaconda although advanced users prefer to install miniconda that avoids installing the full Anaconda suite.
Managing development environments with conda is quite simple since with a very small set of instructions or commands, we can manage all our development environments.
To create a development environment in Python 3.5 we launch the following command in a terminal:
conda create -n py35 python=3.5
This command will create a development environment in Python 3.5. To see and activate the new environment we can launch the following commands:
conda env list lists the collection of environments we have created, the more descriptive the name, the easier it will be to remember what it contains.
conda activate py35 activates the development environment we have created before called py35 with Python version 3.5. Once the environment is activated, we can install specific libraries for that development environment with ‘pip’.
The libraries installed in an environment are only available in that environment and therefore, each environment needs its own collection of libraries.
Another very interesting utility of development environments is that we can export a collection of libraries (the environment) to import them in another project or another machine. The development environment managers are a very powerful tool that should not be missing in the toolbox of any developer.
conda env export py35.yml
Software changes and version control
Another of the most powerful tools we can find in any developer’s toolbox is software changes and version control. Although there are different tools for this purpose, here we will focus on the most widely used one and it is considered a standard, the Git tool.
Git comes embedded as default on Linux, for Mac, you need to install the developer tools with the xcode-select --install command, and for Windows, you need to install it.
Git is a command-line software that lets you save snapshots of your developments, tag them, and generate versions of the code. This is extremely useful for reverting to previous versions of the code, starting parallel developments, recovering files, participating in free software projects, and proposing improvements and/or fixes, etc.
This may seem a bit abstract, so let’s suppose we are developing a project where, as we are finishing small packages of functionality, we save a snapshot of the code, when we finish the project we can save another snapshot and tag it with a version number.
Although this is already very interesting, when the project needs corrections, modifications, functionality extensions or team development, this tool becomes the cornerstone of the tools we will use in any project.
On the other hand, with Git you can access open source repositories or create your own open source or private repository on Github or Bitbucket.
We would need a specific post to see all the commands that Git offers us, so we leave it up to the interested reader to check it out in the official doc.
Finally, we can integrate a Git client in our Atom code editor to make it easier to use with the git-plus package, among others.
Although as is usual with graphical interfaces, its functionality is limited to the most basic commands and we have to use the command line to get the full power of Git.
Data repositories
Another essential utility in any developer’s toolbox is the ability to manage data repositories, typically .csv files and databases. This is very generic as we can find data in csv, excel, hdf5 files and relational databases such as MySQL or PostgreSQL or Non-SQL such as MongoDB.
As developers, we only care about the interface to connect to these data repositories through our programming language. However, when we are developing we usually need to visualize the data in its original state to know the transformations we have to make and to know how to attack the data we are interested in.
Generally, we can use the window applications to visualize the data files or connect to the databases, although our code editor should be flexible enough to allow us to visualize and modify the data directly from the editor itself.
In Atom we can find packages that will facilitate the task of connecting, visualizing and in some cases modifying data repositories, whether in file or database format.
rainbow-csv offers us the feature of visualizing csv files by painting each column a different colour, which makes the review of the data much faster. Look for other Atom packages even to launch queries on csv files as if it were a database.

For databases, there are specific clients within Atom, and you can also use the generic quick-query to launch SQL queries on MySQL or PostgreSQL among many others.
IDEs (Integrated Development Environment)
IDEs have the best of code editors along with a collection of tools that, in theory, prevent us from having to change applications during the entire development workflow, in general, all of them have the tools seen before integrated.
Although most IDEs are capable of handling several programming languages, they are usually oriented to a specific language, such as RStudio for R, Spyder for Python, Eclipse for Java, VisualStudio for C# and a long etc.
In many cases, the best option may be to use an IDE, as for R, Java or C#, but it is still necessary to know the tools mentioned in this post even if we end up using them within the IDE.
In this author’s opinion, many times an IDE encases you in a framework and limits the versatility. Atom is without any doubt the choice of the subscriber of this post.
But as I said at the beginning, there is no such thing as THE DEV TOOL, the best tool is the one that makes your work easier and makes your life more comfortable, so the best thing is not to pay too much attention to me and be the one who tries the different tools to decide which one is your best tool.
Machines in the cloud
One last tool that can’t be missing from a developer’s catalogue is the cloud machines. Currently, we can have Windows/Linux machines with simple configurations or super computers configurations for a reasonable cost.
Regardless of the machine we are using for development, deploying a system in production requires taking into account aspects of architecture, availability, security, etc.
Two of the most popular cloud machine service providers are Google Cloud and AWS and you can start playing with cloud machines for free for a year with simple but sufficient configurations to learn and even deploy applications or simple algorithms. There is no excuse not to try!
Development libraries
Let’s finish with a simple example of how to manage a development project. Let’s suppose that we want to create a fabulous buy-and-hold strategy and we want to generate a performance report to show it to our customers.
For the report, we will use an open source library that we will modify and publish with our change so that other developers can use our modification.
Create a Python environment with Conda
In the command line of our terminal, we type the following command to create a Python environment version 3.6 with Conda.
conda create -n EPAT36 python=3.6
We will create a folder with the name of the project called devlikeapro,
- by typing the following command in the terminal mkdir devlikeapro,
- move to the project folder with the command cd devlikeapro
- activate the environment in the terminal with conda activate EPAT36.
Here we can execute the python --version command to see that we are indeed using Python 3.6.
Now we can install the libraries that we will use in the project in the usual way with ‘pip’.
pip install pandas pandas_datareader pyfolio
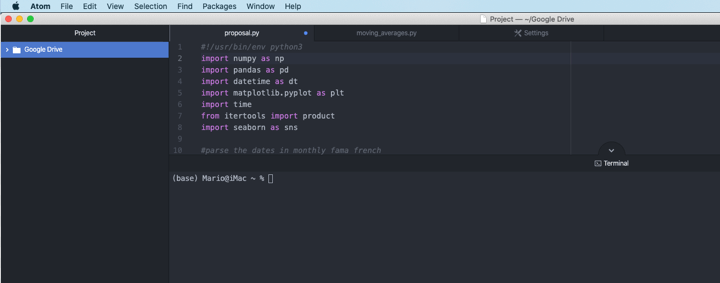
Finally, we open Atom with the atom command and create a new project in the folder we just created.
We assume that we have already installed all the Atom packages that we have mentioned in the post. Look at the image as we have open the terminal inside Atom, but the python development environment we are using is the ‘base’ of Conda.
So we must change to the environment we have created called ‘EPAT36’ with conda activate EPAT36

We are going to create a new Python script with our brilliant strategy in the Atom code editor:
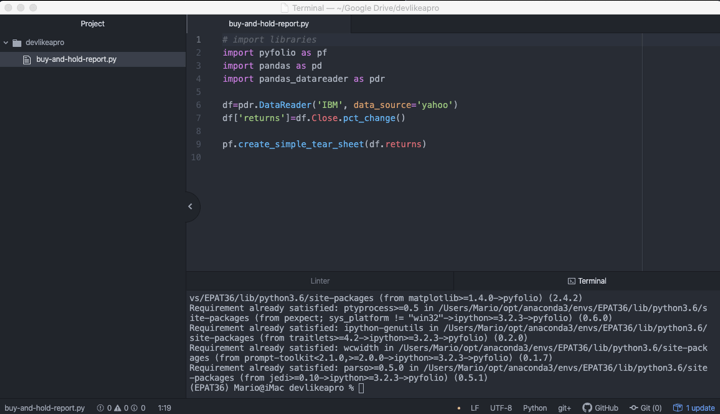
To run the report in Atom, we have used the Atom hydrogen package, which allows us to run the Python script line-by-line. The output offers us a simple pyfolio report with a statistical table and some interesting graphics.

Let’s imagine that we want to modify the pyfolio library to improve, expand or correct anything within the library. This is very useful when we want to collaborate in a free software project or just want to correct some small detail inside the library. In this simple example, we are going to modify some details of the ‘Cumulative returns’ chart.
Before we start, we are going to review the situation in which we have installed the pyfolio library in our system. For this, we execute the command conda list that offers us the list of libraries that we have installed in our Conda environment called ‘EPAT36’.
Looking for pyfolio we can find that we have installed the version 0.9.2 from the pypi repository, that is to say, a standard installation with ‘pip’.

In order to modify the library, we need to download the library source code to our machine, make the changes we need and reinstall this new version of the modified library.
Create a Change and Version Control Repository with Git
We will locate the code repository that has been made publicly available for the pyfolio library and in the green ‘Code’ button we copy the URL address to clone the repository.
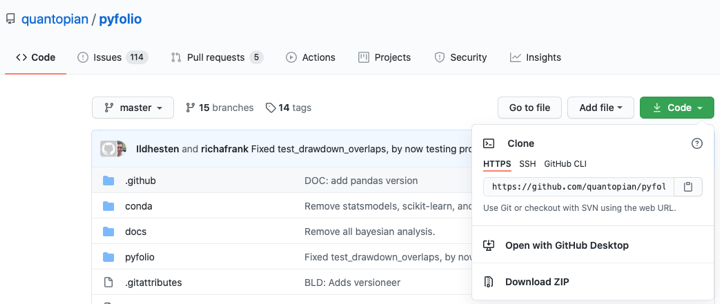
With the URL copied to the clipboard, we type in the terminal git clone https://github.com/quantopian/pyfolio. This command clones (copies) the project from Github to our machine. Now we can open a new project with Atom and modify the library.
As we want to modify the report created by the create_simple_tear_sheet function we will open the pyfolio/pyfolio/tears.py file and look for the create_simple_tear_sheet function that will be on line 231 for the version we are handling.
Within this function, we locate the graphic we want to modify, for example 'Cumulative returns’ which in this case starts it on lines 349-354 and we modify the title to make it more descriptive.

Finally, we need to install the library again, but this time we are going to install the pyfolio project that we have in our machine and we have modified it.
To do this we run the following command python setup.py develop to install the development version we have on our machine.
If everything went well and we have not obtained any errors, we should see that we have installed a development version with the command conda list.

If we return to execute our code to generate the report, we should see the changes we have made.
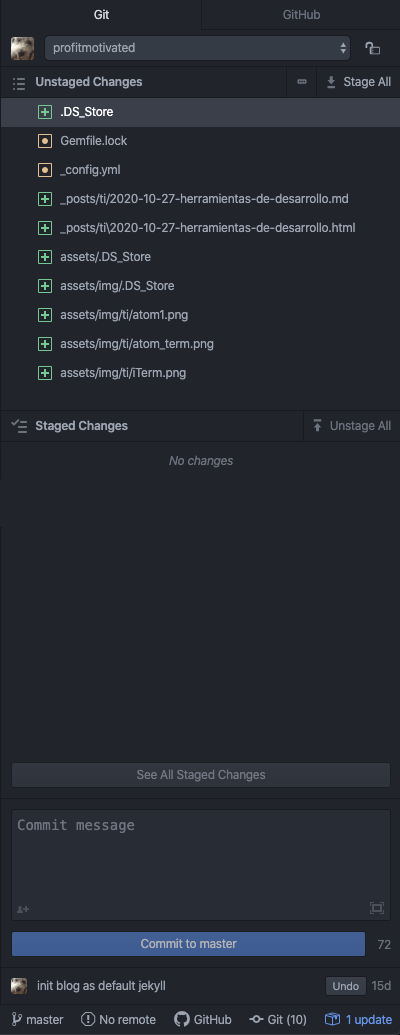
To finish the job, we need to save the changes in our Git for change control. Let’s see what git tells us about the changes we’ve made in pyfolio by running the git status command.
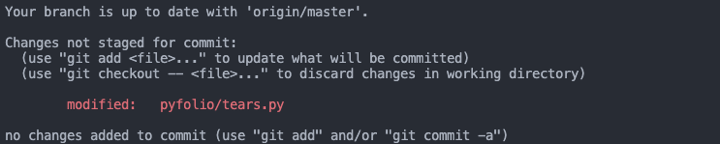
We see that the tears.py file is marked as modified, we need to add that change to the git repository with the command git add pyfolio/tears.py and then we commit with a message that the reason for the change git commit -m 'Improve cumulative returns chart title.
Before you push the code modifications to the original server, you should make sure that you have done the right things and that only the necessary files are being uploaded and that the changes are sufficiently motivated.
Another option is to create your own repository with the fork on github and publish your own version to the world. But this is another story the reader should learn.
Conclusion
We’ve reviewed some of the essential tools that any self-respecting quant programmer should control well enough for her own use and work in a team. We have reviewed the basic tools that, properly configured, can be put at the height of any professional IDE.
In any case, I wanted to emphasize that the name of the tool itself does not matter too much, but it is the functionality and comfort it offers that should lead us to one or another tool.
Finally, we have finished with an example to see how the workflow of professional development would be.
All data and information provided in this article are for informational purposes only. QuantInsti® makes no representations as to accuracy, completeness, currentness, suitability, or validity of any information in this article and will not be liable for any errors, omissions, or delays in this information or any losses, injuries, or damages arising from its display or use. All information is provided on an as-is basis.