By Chainika Thakar, Madhuri Sangaraju & Jay Parmar
The beauty of Python is that we have a collection of modules and packages which have been created for the purpose of making coding with Python easier. Also, the fact that it is open-source makes it incredibly easy for one individual to build on top of another person’s work and create something useful.
Thus, you can get a simple code for performing simple arithmetic operations or a group of code, called modules and packages, which can help perform data analysis, all on the internet.
Let us learn all about Python packages and their applications with this interesting guide that covers:
What are modules and packages?
When we write Python code lines for a particular task, for instance, trade order execution or for entering a trade signal (buy or sell), we use the Python environment such as the Python or IPython console.
In order to write a long program, we might consider a text editor to write the Python code lines. This is known as writing a script.
As a program gets longer, we may want to split it into several small files for easier maintenance. Also, we can find a way to copy and paste the lines of code each time we wish to use the same, without having to create the code lines every time we want the same program.
To support this, Python has a way to put a code definition in a file and use them in any Python script (code lines). Such a file is called a module. The definitions from a module can be imported into other modules or in the program that we code.
Packages are nothing but a collection of modules. It is a way of structuring Python’s module namespace by using "dotted module names".
For example, the module name “matplotlib.pyplot” designates a submodule named “pyplot” in a package named “matplotlib”.
Packaging the modules in such a way saves the author of different modules from having to worry about each other’s global variable names. Also, the use of dots in the module titles saves the author of multi-module packages from having to worry about each other’s module names.
The need to install Python packages
Python has certain in-built packages which are installed along with the installation of Python. But what about the packages that do not come along with Python installation?
If you try to import such packages without installing them first you would get an error called 'ModuleNotFoundError'.
For example, Backtrader is a Python package used for live trading and backtesting trading strategies. You can see the error when we try to import it.
Output:
---------------------------------------------------------------------------
ModuleNotFoundError Traceback (most recent call last)
Input In [47], in <module>
----> 1 import backtrader
ModuleNotFoundError: No module named 'backtrader'
The output above shows an error which is because ‘Backtrader’ is not a built-in Python package and we tried to import it without installing it first.
Backtesting Trading Strategies
Beginner Level
Hence, to install the Backtrader, you can do so by using the “pip” package manager, then open the command prompt (or terminal for Mac users) and type the below code:
Now, you can import Backtrader with the following command:
Importing Python packages
As we know Python is an open-source project. The Python developers community make their codes available for others in the form of packages under the open-source license.
You will have access to some in-built packages such as Pandas, NumPy by default when you install Python.
You can import these packages in your code using the following syntax.
Suppose we want to design a package (a collection of modules) for the uniform handling of various trading strategies and their data. There are many different data files based on data frequencies, so we may need to create and maintain a growing collection of modules for the conversion between the various data frequencies.
Also, there are many different strategies and operations that we might need to perform. All of this put together means we would have to write a never-ending stream of modules to handle the combinatorics of data, strategies, and operations.
Here’s a possible package structure to make our lives easier.
|
strats/ __init__.py data/ __init__.py equity.py currency.py options.py ... strategies/ __init__.py rsi.py macd.py smalma.py peratio.py fundamentalindex.py statisticalarbitrage.py turtle.py ... operations/ __init__.py performanceanalytics.py dataconversion.py ... |
Top-level package Initialize strats package Sub-package for data Equity module Sub-package for strategies RSI module Sub-package for operations |
When importing the package, Python searches through the directories in sys.path looking for the package subdirectory. The __init__.py file is required to make Python treat the directories as containing packages.
If we are to use this package, we can do so in the following manner:
Above statements load the equity and statistical arbitrage modules from the data and strategies sub-packages respectively under the strats package.
Installing Python packages
But where can you find these packages and how to install them? That is what we will find in this section of the blog.
Python for Trading: Basic
PRICE ₹0/
PyPI - Python package index
Most open-source Python packages are made available through PyPI - Python Package Index. It is a repository of software for the Python programming language. You can find the packages developed and shared by the Python community here ⁽¹⁾. You can also publish your package through PyPI.
To install the packages from PyPI you would need a package installer. The recommended package installer for PyPI is ‘pip’. Pip is installed when you install Python in your system.
Installing pip
We can install a pip via the command line by using the curl command, which downloads the pip installation perl script.
Once it is downloaded, we need to execute it in the command prompt with the Python interpreter. This command works for all operating systems such as Windows, Mac, etc.
If the above command fails on a Mac and Linux distribution due to permission issues (most likely because Python does not have permission to update certain directories on the file system.
These directories are read-only by default to ensure that random scripts cannot mess with important files and infect the system with viruses), we may need to run the following command.
In this section of ‘how to install Python packages’, we will understand how to use the following syntax to install a package using ‘pip’.
For example, to install the Backtrader package you have to replace the 'package_name' with 'backtrader'.
Output:
Collecting backtrader
 Downloading backtrader-1.9.76.123-py2.py3-none-any.whl (410 kB)
 ━━━━━━━━━━━━━━━━━━━━━━━━━━━━━━━━━━━━━━━ 410.1/410.1 kB 2.9 MB/s eta 0:00:00a 0:00:01
Installing collected packages: backtrader
Successfully installed backtrader-1.9.76.123
After installation, you can see a success message in the last line. This means the package can now be imported and used in your code. There are a number of institutions along with individuals who use different versions of Python itself, so it goes without saying that there might be versions of packages too.
Let’s find out about package versions in the next section of the tutorial on ‘how to install Python packages’.
A version of the package
PyPI lets the developer submit any number of versions of the package. It holds a record for each combination of package name and version submitted in the repository.
The 'backtrader' package also has different versions ⁽²⁾ available.
Using a different version of the Python package
If you want to use a different version of the package, you can install that using the following command.
Let us install the 1.9.68.122 version of the ‘backtrader’ package.
Output:
Collecting backtrader==1.9.68.122style="padding-left: 40px;">Using cached https://files.pythonhosted.org/packages/f5/6f/e51e5b5969ad1e8071rader-1.9.68.122-py2.py3-none-any.whl
Installing collected packages: backtrader
Found existing installation: backtrader 1.9.78.122
Uninstalling backtrader-1.9.70.122:
Successfully uninstalled backtrader-1.9.70.122
Successfully installed backtrader-1.9.68.122
Check for the version of the package
You can use the following syntax to check for the version of the package.
But first, you need to import the package. You can check for the version of the 'Backtrader' package as follows.
Output:
'1.9.68.122'
Things to note
- Pip installs the latest version of the package by default.
- While installing the specific version pip replaces the existing version if there is any.
- You can use the above syntax for installing the packages through the IPython notebook.
- If you wish to install using the command prompt you can use the same syntax by just removing the exclamation mark.
For example,
IPython notebook:
Command prompt:
I hope this will clarify any queries or doubts that you might have about installing Python packages. One of the popular ways to traverse through the Python codes and packages is the dir() function. Let’s learn more about what it does in the next section of the tutorial on ‘how to install Python packages’.
Bonus: dir()function
We can use the built-in function dir() to find which names a module defines. It returns a sorted list of strings.
Output:
['__builtins__',
'__cached__',
'__doc__',
'__file__',
'__loader__',
'__name__',
'__package__',
'__spec__',
'addition',
'division',
'factorial',
'multiply']
dir()function | 61
Here, we can see a sorted list of names within the module arithmetic. All other names that begin with an underscore are default Python attributes associated with the module (we did not define them).
Without arguments, dir() lists the names we have defined currently:
Output:
['__builtins__',
'a',
'arithmetic',
'b',
'exit',
'Quit']
Note that it lists all types of names: variables, modules, functions, etc. The dir() does not list the names of built-in functions and variables. They are defined in the standard module builtins. We can list them by passing builtins as an argument in the dir().
Output:
'ArithmeticError', 'AssertionError',
'AttributeError', 'BaseException',
'BlockingIOError', 'BrokenPipeError',
'BufferError', 'BytesWarning', 'ChildProcessError',
'ConnectionAbortedError', 'ConnectionError',
'ConnectionRefusedError', 'ConnectionResetError',
'DeprecationWarning', 'EOFError', 'Ellipsis',
'EnvironmentError', 'Exception', 'False',
'SyntaxError', ... ]
Now, let us find out answers to some common questions of the users next. This could help you with an answer in case you are facing the same issues with Python packages and need help.
Resolution of frequent user queries
As you begin to learn Python, you might encounter certain issues with respect to the platform and might feel that you are the only one here. Well, over the years we have seen queries from users which are common and most of them struggle to find answers to them. Thus, we'll try to address some of them in this section.
The queries we will address are:
- Cannot install iexfinance using conda install
- Import get_data from iexfinance does not work
- Dependency packages - scikit-learn
Note: iexfinance errors are not available in the updated version of Anaconda
Query #1: Cannot install iexfinance using conda install
If you have installed Python using Anaconda, then you are familiar with the installation of Python packages using conda installer.
To install ‘iexfinance’ you would write-
But this would throw an error as follows.

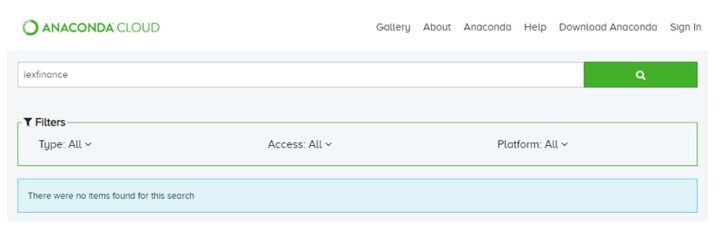
This is because the package is not available in the Anaconda repository.
You can check for the same in the repository ⁽³⁾. It shows no results.
As mentioned earlier, You can search for the ‘iexfinance’ package in PyPI and check out the result as shown.
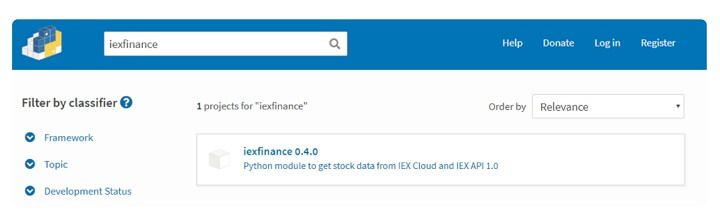
Thus, you can use the ‘iexfinance’ package using PyPI’.
You need to use ‘pip’ instead of ‘conda’ in your Anaconda prompt to install the packages from PyPI.
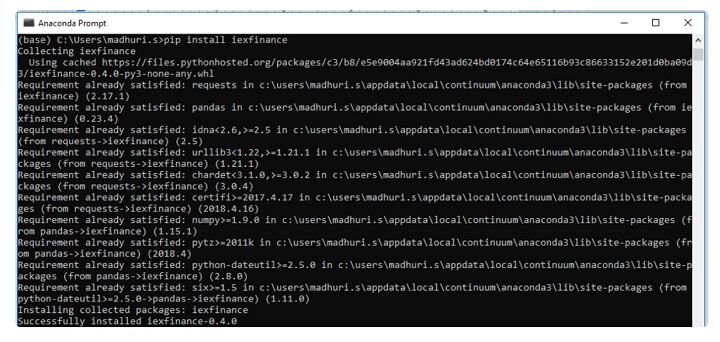
Write ‘pip install iexfinance’ in the Anaconda prompt to install the iexfinance package.
All right! Let’s move on to the next query in the tutorial on how to install Python packages.
Query #2: Import get_data from iexfinance does not work
You can see the success message in the last line along with the version of the package installed. Currently, version - 0.4.0 of ‘iexfinance’ is installed.
Also, whenever the package is updated, a new version is released.
To check the version of the ‘iexfinance’ package at any point in time, you can run the following command in the Anaconda prompt.
`python -c "import iexfinance; print(iexfinance.__version__)"`

You can update to the most recent version of the ‘iexfinance’ package by just running the pip install command again. Pip by default installs the latest version of ‘iexfinance’.
The command, as mentioned earlier, is as follows.
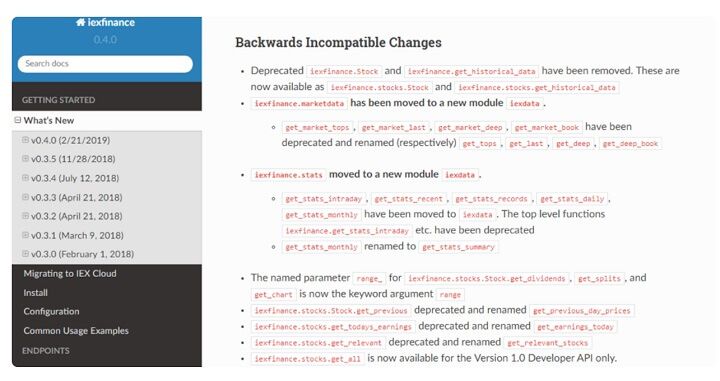
If you are updating the package in your system then you should be aware of the changes made and you might want to change your codes also accordingly.
For the ‘iexfinance’ package, the changes made from the previous version to the latest version are documented here ⁽⁴⁾ under the ‘Backwards Incompatible Changes’ section.
Great! Just one more remaining. Let’s move on to the next query in the tutorial on how to install Python packages
Query #3: Check for the dependency packages - scikit-learn
Let’s go back to this image once more.

You can see while installing ‘iexfinance’ pip checked for a lot of other Python packages such as requests, pandas etc.
These are the dependency packages that are required to run ‘iexfinance’ smoothly.
For the ‘scikit-learn’ package you can find the dependency packages in the PyPI project description.
It will look like this:
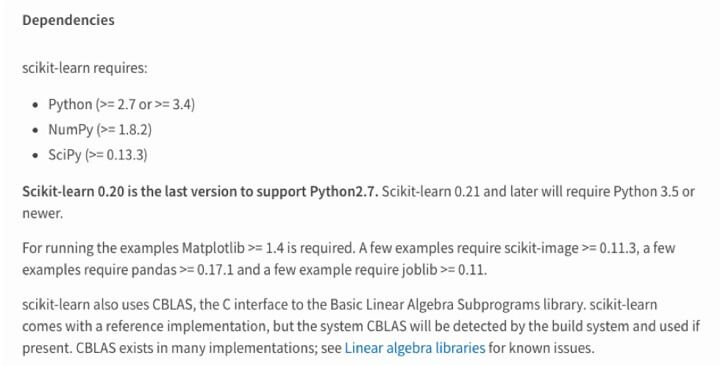
You can also see the versions for the dependency packages.
Whenever you try to install or upgrade ‘scikit-learn’, make sure the scipy and numpy packages are also upgraded to their latest versions.
You can run the following for installing or upgrading the ‘scikit-learn’ package.
Note: Restart the Kernels
Do not forget to restart the kernels in Jupyter or Spyder before you start using ‘scikit-learn’ package in your code. Otherwise, you would face an error while importing the ‘scikit-learn’ package.
This happens because when you open the Jupyter or Spyder to code they create a Python environment based on the package versions existing at that point in time. So, whenever you install or upgrade a new package you need to restart the kernel too.
Also, you can learn how to set up Python on your system for following easy installation and setting up steps.
Conclusion
We've seen how to install Python packages and also addressed some of the most frequently asked queries about Python here in this tutorial on how to install Python packages. Hope this helps in creating a smooth journey as you explore Python!
There are many people who might be new to Python or programming in general or never created any trading strategy. The learning curve could be steep if you are a beginner in both these skills. However, you can build the required skills gradually and practice regularly on the hands-on learning exercises given in our course by enrolling in Algorithmic Trading for Everyone.
Note: The original post has been revamped on 20th April 2023 for accuracy, and recentness.
Disclaimer: All data and information provided in this article are for informational purposes only. QuantInsti® makes no representations as to accuracy, completeness, currentness, suitability, or validity of any information in this article and will not be liable for any errors, omissions, or delays in this information or any losses, injuries, or damages arising from its display or use. All information is provided on an as-is basis.